
TL;DR:
- Proper planning with thorough DNS audits and staging environments is essential for a successful website migration. Lowering DNS TTL in advance and mapping URLs with redirects help preserve SEO rankings and prevent traffic loss. Continuous post-launch monitoring ensures quick recovery from common issues like broken links or email failures.
Website migration is the process of moving all your site's files, databases, DNS records, and services from one hosting environment to another while protecting uptime, SEO rankings, and email functionality. Done wrong, it causes broken links, lost search traffic, and silent email failures that can take weeks to detect. Done right, it's a structured sequence of auditing, staging, DNS management, and post-launch monitoring. This guide covers every step, from the tools you need before you start to the checks you run 30 days after launch.
What does a successful website migration require?
A successful website migration requires three things before you touch a single file: a complete audit of your current environment, verified backups, and a staging setup that mirrors your live site. Skip any of these and you're flying blind. Most administrators underestimate how many services depend on DNS records beyond the website itself, including email, payment webhooks, and third-party integrations.
Audit your current hosting environment
Start by documenting every DNS record in your current zone file. That means A records, CNAME records, and every email-related record: MX, SPF, DKIM, and DMARC. Email can fail silently if MX and related DNS records are not properly recreated after a nameserver change. A DNS dependency audit for email, webhooks, payments, and integrations is as critical as the file and database migration itself.
Gather all administrative credentials before you begin. You need login access to your current hosting control panel, your new hosting account, your domain registrar, and your DNS provider. Missing any one of these on migration day creates delays that compound quickly.
Set up a staging environment
A staging environment is a private copy of your new site that you build and test before switching DNS. Staging and test audits are a key step in any migration checklist because they let you catch broken functionality, plugin conflicts, and configuration errors without affecting live traffic. Block the staging site from search engine indexing using robots.txt or noindex tags. Blocking staging environments from indexing prevents duplicate content issues during the testing phase.
A comprehensive staging setup includes modifying your local hosts file to map the new server's IP address to your domain. This lets you browse the new site in your browser as if it were live, without changing public DNS.
Reduce DNS TTL in advance
Lower your DNS TTL (Time to Live) value 24–48 hours before migration. Reducing TTL before DNS changes speeds up propagation and reduces the window where some visitors hit the old server while others hit the new one. A TTL of 300 seconds (5 minutes) is a common target during the cutover window.
Pro Tip: Record your current TTL value before lowering it. Once migration is complete and stable, restore the TTL to its original setting to reduce DNS query load.
Here is a quick reference for the key tools and records you need to prepare:
| Item | What to prepare |
|---|---|
| DNS zone file | Export all records: A, CNAME, MX, SPF, DKIM, DMARC, TXT |
| Website backup | Full file backup plus database export (SQL dump) |
| Staging environment | New hosting account with hosts file IP mapping |
| Admin credentials | Current host, new host, registrar, DNS provider |
| DNS TTL | Lower to 300 seconds at least 24 hours before cutover |
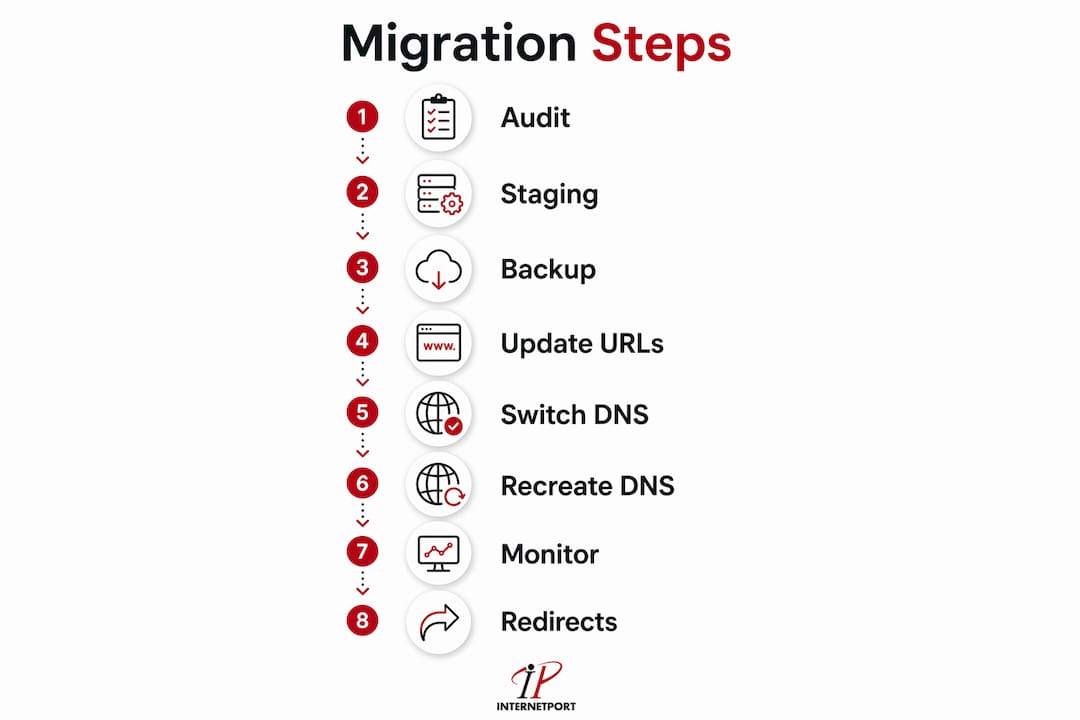
How to migrate a website step by step
The safest migration sequence follows audit, build and test, DNS switch, then monitoring. Switching DNS before the new environment is fully tested is the single most common cause of downtime. Follow this order without shortcuts.
Step 1: Audit and document your current site
List every page, plugin, theme, and third-party integration on your current site. Document the server software version, PHP version, and database type. Note any custom server configurations such as .htaccess rules or cron jobs. This document becomes your checklist for replicating the environment on the new host.

Step 2: Build and test the new environment on staging
Install your site on the new hosting account and configure it to match the current environment. Run a full technical audit on the staging site: check page load times, form submissions, checkout flows, and any API integrations. Verify that Googlebot can crawl the staging site if you plan to use Google Search Console tools post-launch, but keep the noindex block active until you are ready to go live.
Pro Tip: Use a tool like Screaming Frog to crawl your staging site and compare the results against a crawl of your live site. Any missing pages or broken links show up immediately.
Step 3: Back up and transfer all files and databases
Export a full backup of your live site immediately before cutover. Upload all files to the new server via SFTP or your hosting control panel's file manager. Export your database as an SQL dump and import it into the new database. Update the database connection credentials in your configuration file (wp-config.php for WordPress, .env for Laravel-based sites, or the equivalent for your platform).
Step 4: Update configuration files and internal URLs
Search your database for hardcoded references to the old server path or domain. Tools like WP-CLI's search-replace command handle this for WordPress sites. For other platforms, run a database find-and-replace using a tool like Adminer or phpMyAdmin. Confirm that all internal links, image paths, and asset URLs resolve correctly on the staging site before proceeding.
Step 5: Switch DNS carefully
For a hosting-only migration where the domain stays the same, updating A or AAAA records is safer than switching nameservers. Changing only the IP address keeps your existing DNS zone intact and reduces the risk of accidentally dropping email or other records. If you must switch nameservers, recreate every DNS record on the new provider before making the change.
Point the A record to your new server's IP address after confirming the staging site is fully functional. DNS propagation typically completes within the TTL window you set in advance.
Step 6: Recreate all DNS records on the new provider
Before the nameserver switch takes effect, verify that MX, SPF, DKIM, and DMARC records are live on the new DNS provider. Send a test email immediately after propagation to confirm delivery. Check all webhook endpoints and payment gateway callbacks to confirm they are receiving traffic correctly.
Step 7: Monitor site and email functionality post-launch
Watch your server error logs, uptime monitoring tool, and analytics dashboard for the first 24–48 hours. A sudden drop in sessions or a spike in 404 errors signals a configuration problem. Confirm that SSL certificates are active and auto-renewing on the new host.
Step 8: Remove staging blocks and enable 301 redirects
Once the new site is live and confirmed working, remove the noindex tags and robots.txt staging blocks. If your URL structure changed during migration, implement 301 redirects immediately. For a cloud hosting migration that also involves infrastructure changes, the SMB cloud migration guide from Internetport covers the infrastructure audit steps in detail.
How to preserve SEO rankings during a website move
Migration impact on traffic varies significantly by migration type. A hosting-only move with no URL changes causes minimal SEO disruption. A domain change or URL restructure can cause weeks of ranking fluctuation. The difference comes down to how precisely you map and redirect old URLs to new ones.
Implement one-to-one URL mapping and 301 redirects
Create a spreadsheet that maps every old URL to its exact new equivalent before launch. Permanent 301 or 308 redirects pass SEO value to the new URL and signal to search engines that the move is permanent. Temporary 302 redirects do not pass full link equity and cause search engines to keep indexing the old URL.
Validate every redirect at launch using a tool like Screaming Frog or Ahrefs Site Audit. Redirect chains (old URL redirects to a second URL that redirects to a third) dilute link equity and slow page load times. Resolve chains to direct one-to-one redirects wherever possible.
Use Google Search Console for domain migrations
When moving to a new domain, Google Search Console's Change of Address tool requires verified ownership of both the old and new domains, live 301 redirects from old to new, and manual submission. Google's processing can take weeks to months to fully complete. Submit the tool only after redirects are confirmed working.
Update your XML sitemap to reflect new URLs and submit it in Google Search Console on the new property. Update robots.txt to allow crawling of all pages that should be indexed.
Here is a comparison of SEO risk by migration type:
| Migration type | SEO risk level | Key action required |
|---|---|---|
| Hosting only (same domain, same URLs) | Low | Verify redirects, monitor crawl errors |
| URL restructure (same domain) | Medium | One-to-one URL mapping, 301 redirects |
| Domain change | High | Change of Address tool, full redirect map |
| Platform change with URL restructure | Very high | Full audit, redirect map, sitemap resubmission |
Post-migration SEO monitoring should run for at least 30–90 days after launch. Schedule a follow-up technical audit at the 30-day mark to catch redirect chains, broken links, or indexing gaps that were not visible at launch.
What are the most common website migration problems?
Risk management with benchmarks and rollback plans is the difference between a migration that recovers quickly and one that causes days of downtime. Every migration plan needs a defined rollback procedure: the exact steps to revert DNS to the old server if a critical failure occurs within the first hour of cutover.
The most common problems and their fixes:
- Silent email failure. MX, SPF, DKIM, or DMARC records were not recreated on the new DNS provider. Fix: audit the full DNS zone before and after migration, then send test emails immediately post-cutover.
- 404 errors on key pages. URL structure changed without corresponding 301 redirects. Fix: run a full crawl with Screaming Frog post-launch and map all 404s to correct redirect targets.
- Staging site indexed by Google. The noindex block was removed too early or was never applied. Fix: check Google Search Console for unexpected indexing of staging URLs and reapply blocks if needed.
- SSL certificate errors. The certificate was not provisioned or renewed on the new host. Fix: confirm SSL is active before switching DNS and verify HTTPS loads correctly on the staging IP.
- Crawl errors from leftover noindex tags. Staging noindex tags were not removed after launch. Fix: audit meta robots tags and robots.txt on the live site within 24 hours of going live.
"Treat every DNS-dependent service as a first-class migration dependency. Email, payment webhooks, and API callbacks all break silently if their DNS records are not recreated before cutover."
In the AI-driven search era, site migrations need additional attention to content indexing and presentation. AI-powered search features pull structured content from indexed pages, so any gap in crawl access during or after migration can reduce your visibility in AI-generated answers and featured snippets.
Use Google Analytics, Google Search Console, and an uptime monitoring tool like UptimeRobot in parallel during the post-launch window. Each tool catches a different class of problem: analytics detects traffic drops, Search Console surfaces crawl errors, and uptime monitoring catches server-level outages.
Key Takeaways
A website migration succeeds when auditing, staging, DNS management, and post-launch monitoring are executed in the correct sequence without skipping steps.
| Point | Details |
|---|---|
| Audit before everything | Document all DNS records, credentials, and integrations before touching any files. |
| Stage and test fully | Build the new environment on staging and run a complete technical audit before switching DNS. |
| Lower TTL 24–48 hours early | Reducing DNS TTL in advance cuts propagation time and limits split-traffic risk during cutover. |
| Map URLs and add 301 redirects | One-to-one redirect mapping preserves SEO value and prevents 404 errors after URL changes. |
| Monitor for 30–90 days post-launch | Schedule a follow-up audit at 30 days to catch redirect chains, indexing gaps, and broken links. |
What I've learned from watching migrations go wrong
Most website migrations fail in the planning phase, not the execution phase. Administrators spend hours on file transfers and almost no time on DNS dependency audits. Then they switch nameservers, email stops working, and they spend two days troubleshooting a problem that a 20-minute DNS audit would have prevented.
The staging environment is the most underused tool in the migration process. I've seen teams skip it entirely because they were confident the new host was "the same setup." It never is. PHP version differences, missing server extensions, and misconfigured caching layers all surface on staging. They do not surface until a customer complains if you skip it.
SEO recovery after a domain migration takes longer than most stakeholders expect. Google's Change of Address tool helps, but it does not accelerate the process as much as people hope. The honest timeline is 4–12 weeks of ranking fluctuation for a domain change, even with perfect redirects. Set that expectation before launch, not after a panicked call from a client watching their traffic drop.
The detail that surprises most administrators is how much AI-driven search visibility depends on clean, uninterrupted indexing. A two-week gap in crawl access during a migration can remove your content from AI-generated answers for months. That is a new risk that did not exist three years ago, and most migration checklists have not caught up to it yet.
My practical recommendation: treat the post-migration monitoring window as a project phase, not an afterthought. Assign someone to check Search Console, analytics, and uptime reports every day for the first two weeks. The issues that slip through at launch are almost always fixable if you catch them within 48 hours. The same issues become expensive if you find them three weeks later.
For administrators handling infrastructure alongside the website move, the cloud migration process guide covers the broader infrastructure audit steps that complement what is covered here.
— Peter
Internetport's hosting plans support safe website migrations
Migrating to a new host is significantly less stressful when the destination environment is built for it. Internetport's web hosting plans include managed DNS settings, staging support, and technical assistance that cover the most error-prone parts of any migration.
Internetport operates data centers in Sweden and internationally, with PCI DSS compliance and high-availability infrastructure built in. Their support team handles DNS configuration, SSL provisioning, and post-migration monitoring so you are not troubleshooting alone at 2 a.m. after a DNS switch. For sites with higher traffic demands, Internetport's dedicated server options provide full resource isolation and maximum control during and after the migration process.
FAQ
What is website migration?
Website migration is the process of moving a site's files, databases, DNS records, and services from one hosting environment to another. The goal is to complete the move with minimal downtime, no loss of SEO rankings, and full continuity of email and integrations.
How long does a website migration take?
A straightforward hosting-only migration can be completed in a few hours. A domain change or platform migration with URL restructuring typically requires several days of preparation and 4–12 weeks of post-launch monitoring for full SEO recovery.
How do I avoid losing SEO rankings during migration?
Create a one-to-one URL map and implement permanent 301 redirects for every changed URL before launch. For domain changes, use Google Search Console's Change of Address tool after verifying ownership of both domains and confirming redirects are live.
Why does email stop working after a website migration?
Email fails after migration when MX, SPF, DKIM, or DMARC records are not recreated on the new DNS provider. Always audit your full DNS zone and send test emails immediately after DNS propagation to confirm delivery.
What is a DNS TTL and why does it matter for migration?
TTL (Time to Live) is the value that controls how long DNS resolvers cache your records. Lowering TTL to 300 seconds at least 24 hours before migration reduces propagation time and limits the window where visitors are split between the old and new server.