
TL;DR:
- Effective colocation requires thorough planning, detailed documentation, and proactive risk management.
- Redundancy, headroom, and regular testing are essential for high availability and disaster preparedness.
- Strong operational discipline and communication sustain long-term reliability beyond initial setup.
A failed colocation setup isn't just an IT headache. It's a business crisis. Unexpected downtime can cost organizations anywhere from thousands to hundreds of thousands of dollars per hour, and the root cause is rarely hardware failure. It's almost always a broken workflow: skipped steps, vague requirements, undocumented decisions. This guide walks IT managers through a proven, practical colocation setup workflow, from initial assessment to ongoing management, so your infrastructure stays reliable, your team stays aligned, and your organization avoids the painful surprises that derail even well-funded projects.
Table of Contents
- Assessing requirements and preparing for colocation
- Building your colocation setup: step-by-step workflow
- Monitoring, testing, and ongoing management
- Avoiding common pitfalls in colocation setup
- A practical perspective: what years of colocation experience reveal
- Bring reliable colocation to your organization
- Frequently asked questions
Key Takeaways
| Point | Details |
|---|---|
| Thorough preparation matters | Assess hardware, power, cooling, and growth before any move to avoid costly mistakes. |
| Follow a defined workflow | Use a clear sequence for setup and testing to reduce downtime and confusion. |
| Ongoing management is essential | Continuous monitoring, DR drills, and regular reviews guarantee reliability. |
| Avoid under-provisioning | Plan for at least 20% expansion headroom to future-proof your setup. |
| Leverage expert support | A strong partner accelerates setup and ensures operational success. |
Assessing requirements and preparing for colocation
Strong colocation projects don't begin in the data center. They begin in a conference room with a spreadsheet, a whiteboard, and a ruthless commitment to specificity. Before a single server ships, you need a complete picture of what you're deploying, how much power it needs, how it will be cooled, and how it will grow.
A solid hosting needs assessment captures every physical asset: servers, storage arrays, networking switches, patch panels, KVM units, and any specialized appliances. Don't guess. Walk the server room, pull the rack diagrams, and verify serial numbers against your CMDB (Configuration Management Database). Errors at this stage become expensive corrections later.
Power planning is where many teams get caught off guard. Each rack's power draw must be calculated in kilowatts, accounting for peak loads rather than average consumption. The colocation setup workflow typically begins with assessing current infrastructure needs including hardware inventory, power draw, cooling requirements, network bandwidth, and projected growth over 12 to 36 months. A useful rule: plan for 20 to 30% headroom above your measured peak draw. That buffer isn't waste. It's the difference between a scheduled expansion and an emergency.
Here's a quick-reference checklist for your pre-deployment assessment:
- Document all hardware with make, model, and power specs
- Calculate peak power draw per rack (measured in kW)
- Identify cooling requirements based on BTU output per rack unit
- Map all network connections: uplinks, cross-connects, and external circuits
- Define bandwidth requirements: committed versus burstable
- Confirm redundancy requirements: dual power feeds, dual WAN, UPS coverage
- Forecast growth scenarios for 12, 24, and 36 months
| Assessment area | Minimum standard | Recommended headroom |
|---|---|---|
| Power per rack | 5 kW | 20 to 30% above peak |
| Cooling capacity | 1,000 BTU/hr per kW | Matched to rack density |
| Network bandwidth | 1 Gbps baseline | 2x projected peak traffic |
| Physical space | 1U per device | 10 to 20% empty rack units |
Pro Tip: Use a standardized site readiness checklist shared across your team and the colocation provider before signing the contract. Mismatches discovered after signing cost time, money, and credibility.
Understanding data center basics early helps your team ask the right questions during facility tours. What's the redundancy model? N+1 or 2N for power? What's the cooling architecture? Hot aisle and cold aisle containment matters more at higher densities. Enterprise deployments are power-hungry: over 30% of enterprises now exceed 10 kW per rack. If you're building for dense GPU workloads or high-frequency compute, plan for significantly more from the start.
Building your colocation setup: step-by-step workflow
With your requirements clarified, here's how to execute the colocation setup smoothly, step by step.
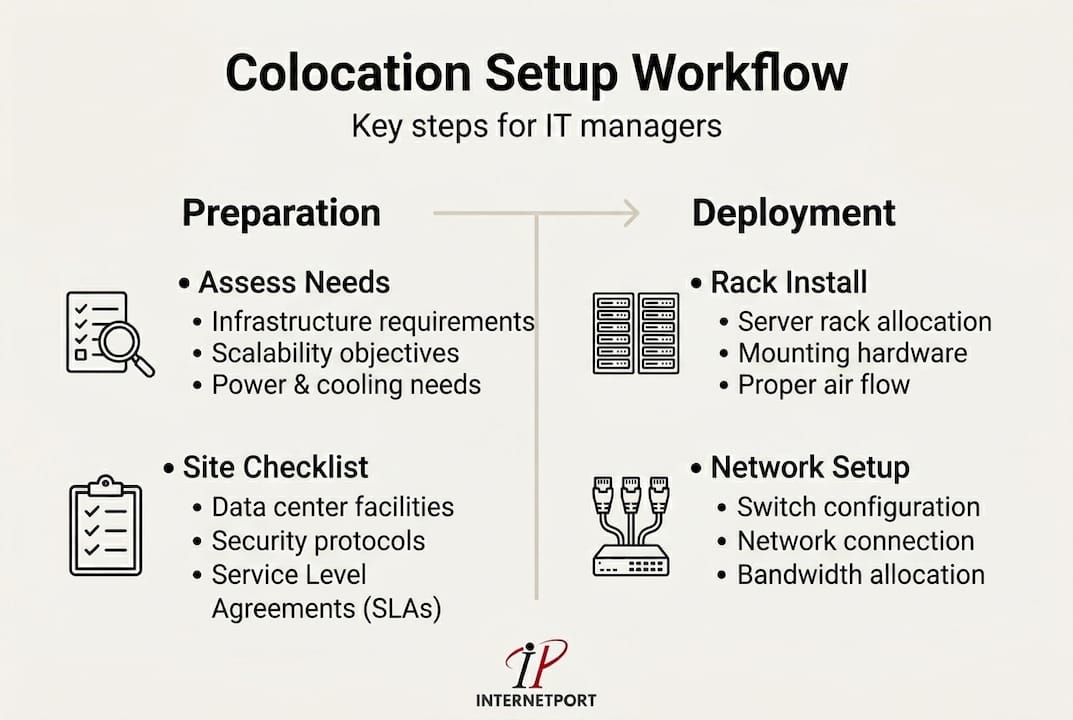
A well-sequenced workflow prevents the most common on-site disasters: cables routed incorrectly, power circuits overloaded before baseline testing, or IP addressing errors that take hours to trace. Each step below should be treated as a formal handoff, documented and signed off before moving to the next.
Step 1: Rack allocation and physical layout. Work with the colocation provider to assign rack positions based on your power map and cooling zones. Confirm that adjacent racks won't push the PDU (power distribution unit) circuits beyond rated capacity. Get floor plan documentation in writing.
Step 2: Hardware transport and receiving. Ship equipment in original packaging where possible, with detailed packing lists. Upon delivery, inspect all hardware against your manifest before signing the receiving document. A single missing HBA (host bus adapter) card can delay your entire go-live timeline.
Step 3: Rack installation and cabling. Mount servers and equipment according to your rack diagram. Follow the colocation benchmarks for power headroom, and wire power connections to separate circuits for redundancy. Use color-coded cables: one color for management networks, another for production traffic, another for storage if applicable.

Step 4: Initial configuration and network bring-up. Configure out-of-band management (IPMI, iDRAC, or iLO) first, so you have console access before anything else. Bring up management networks, then production interfaces. Document every IP address, VLAN assignment, and switch port in your network diagram before going live.
Step 5: Validation testing. Run load tests, ping sweeps, and connectivity checks across all interfaces. Verify that failover paths work by deliberately disabling primary links and confirming traffic fails over cleanly.
Pro Tip: Label every cable at both ends with printed labels before it enters the rack. During a 2 AM maintenance window six months from now, you'll be very glad you did.
A note on facility tier and selecting hosting solutions: Tier III and above facilities provide concurrent maintainability, meaning infrastructure can be serviced without shutting down hosted equipment. For workloads that require preventing data center outages, selecting a Tier III+ facility isn't optional. It's baseline.
Here's a comparison of single-site versus multi-site colocation redundancy:
| Factor | Single-site colocation | Multi-site colocation |
|---|---|---|
| Cost | Lower upfront | Higher, but justified for critical workloads |
| Disaster resilience | Limited to facility redundancy | Full geographic failover capability |
| Latency | Minimal (single location) | Requires careful application design |
| Compliance | Sufficient for many use cases | Required for financial and healthcare sectors |
| Complexity | Straightforward to manage | Requires cross-site synchronization |
A 99.999% SLA translates to less than 6 minutes of unplanned downtime per year. That's not a marketing number. It's an operational benchmark that shapes everything from your DR plan to your network topology. If your business can't tolerate more than a few minutes of annual downtime, single-site deployments require serious scrutiny.
Monitoring, testing, and ongoing management
Once setup is complete, your work isn't over. Post-deployment vigilance ensures lasting reliability and genuine value from your colocation investment.
The first 30 days after go-live are your most revealing. Equipment that passed testing sometimes behaves differently under production load. Thermal profiles shift. Unexpected traffic patterns emerge. This is not the time to reduce attention. It's the time to formalize your monitoring stack and get baselines established.
Post-setup best practices include implementing monitoring and alerts, testing DR and failover procedures, optimizing through performance baselines, and establishing ongoing management workflows with remote hands support. Each of these is a system, not a one-time task.
Your monitoring platform should cover:
- Power draw per PDU outlet and per rack total
- Temperature sensors at intake and exhaust points
- WAN link utilization and latency (per circuit, per carrier)
- Server CPU, memory, disk, and network interface metrics
- Out-of-band management reachability for all devices
- Automated alerting with defined escalation paths
99.999% SLA in practice: Achieving that benchmark requires more than a strong facility. It requires your monitoring to detect anomalies before they cascade. A temperature spike that triggers an alert 10 minutes before a server throttles is recoverable. One discovered after a crash is not.
| Monitoring metric | Alert threshold | Escalation action |
|---|---|---|
| Rack temperature | Above 27°C intake | Remote hands inspection |
| Power draw | Above 90% of circuit capacity | Immediate load review |
| WAN packet loss | Above 0.5% sustained | ISP ticket and failover test |
| Disk I/O latency | Above 10ms average | Storage performance review |
| Management network | Any device unreachable | Remote hands ping test |
Pro Tip: Automate escalation routing so that severity-1 alerts page an on-call engineer directly, bypassing email queues. Reducing MTTR (mean time to recovery) by even 15 minutes per incident compounds into significant uptime improvements over a year.
The colocation server solutions available through established providers often include remote hands services, which means a trained technician can physically inspect, reboot, or recable your equipment on request. Factor this into your DR plan. Not every incident requires a site visit from your own staff. Remote hands can act faster in most cases, especially across international time zones.
Securing your hosted environment is equally non-negotiable. Applying cloud environment security principles, such as network segmentation, access control lists, and encrypted management channels, to your physical colocation setup protects against both logical and physical threats. Review these controls at least quarterly.
Avoiding common pitfalls in colocation setup
Even strong workflows can unravel if classic mistakes slip in. Awareness of these failure patterns is your best safeguard against costly setbacks.
The most frequent and expensive mistakes in colocation aren't exotic. They're predictable, preventable, and surprisingly common even among experienced IT teams. Recognizing them before they happen is far cheaper than recovering after they do.
Failure to plan for growth. The infrastructure assessment must account for hardware inventory, power draw, cooling requirements, network bandwidth, and projected growth over 12 to 36 months. Teams that skip the growth projection often find themselves capacity-constrained within 18 months, forced into emergency expansions that cost two to three times more than planned upgrades would have.
Under-provisioning power and cooling. This is the second most common failure mode. A rack that runs at 8 kW during testing may peak at 11 kW under production holiday traffic. Without headroom, you're looking at thermal shutdowns or tripped circuit breakers. Neither is acceptable.
Single points of failure in network design. A single upstream link, a single switch, a single power feed. Each represents a risk that a simple hardware failure converts into a full outage. Cloud scalability and security principles apply directly here: redundancy at every layer is the baseline, not a premium option.
Ignoring DR and failover testing until after an incident. DR plans that exist only on paper are not DR plans. They're wishes. Teams that avoid data protection mistakes treat DR testing as a standing agenda item, not a reaction to a near-miss.
Industry reality check: Over 30% of enterprises now exceed 10 kW per rack. If you're planning a dense compute deployment and your design assumes 5 to 7 kW per rack, you're already behind before the first server ships.
Key pitfalls summarized:
- Skipping the 36-month growth forecast during planning
- Using average power draw instead of peak draw for circuit sizing
- Single upstream ISP connection with no failover circuit
- Neglecting out-of-band management setup for remote access
- No documented escalation path for facility-side incidents
- Skipping post-setup baseline measurement (so you can't detect degradation)
Pro Tip: Schedule quarterly DR drills and infrastructure reviews as recurring calendar events, not ad hoc activities. Treating them as routine removes the organizational friction that causes them to be skipped during busy periods.
A practical perspective: what years of colocation experience reveal
The colocation projects that succeed long-term share one thing that no checklist captures: a culture of documentation and communication that outlasts the initial setup team.
Here's something vendors rarely tell you. The technology in a colocation environment almost never fails outright. Power redundancy works. Cooling systems hold. Network paths fail over as designed. What actually breaks is the human layer. A cable gets moved during an unrelated maintenance window and isn't documented. A new team member doesn't know which circuit feeds which rack. An alert fires and no one knows the escalation path because it was in the head of someone who left six months ago.
We've seen organizations spend considerable budget on dedicated server management improvements, only to find that their monitoring and escalation procedures were never written down in a form that survived staff turnover. The infrastructure was fine. The operational knowledge was gone.
The other overlooked reality is about remote hands. Many IT managers assume automation and monitoring eliminate the need for physical intervention. In practice, remote hands support remains essential for anything that requires eyes and hands in the cabinet: confirming cable seating, power cycling a hung device, or visually inspecting an indicator light. Automation handles detection brilliantly. It cannot plug in a console cable.
Planning for headroom and redundancy is financially counterintuitive in the short term. Provisioning 30% more power than you need today feels wasteful in a budget meeting. But the cost of an emergency capacity expansion, rushed cabling work, and the downtime associated with it will typically exceed the cost of that headroom several times over within the first contract term.
The most resilient colocation environments we've observed treat documentation as a living operational system, not a project deliverable. Runbooks are updated after every incident. Network diagrams are version-controlled. Every change to the physical environment is logged with a timestamp, a reason, and a responsible party. That discipline is what makes a colocation deployment genuinely reliable across years, not just across the first quarter after go-live.
Bring reliable colocation to your organization
Putting this workflow into practice is straightforward when you have the right infrastructure partner behind you.
Internetport operates fully equipped data centers with redundant power and cooling systems, PCI DSS certification, and high-speed connectivity, giving IT managers the foundation they need to execute colocation deployments with confidence. Whether you're deploying your own hardware through our colocation server options, running workloads on dedicated server solutions, or managing your web presence through professional webhosting, our team is ready to support your planning and deployment from day one. Speak with our infrastructure specialists to map your specific requirements to the right solution.
Frequently asked questions
How long does the typical colocation setup take?
A standard colocation setup workflow usually takes between one and three weeks depending on hardware arrival, provider timelines, and internal readiness. Complex multi-site deployments or custom power requirements can extend that timeline to four to six weeks.
What's the most common mistake IT teams make in colocation deployments?
Underestimating future growth and failing to provision enough power or cooling capacity is the most frequent error, often forcing costly emergency expansions within the first 18 months. Starting with the infrastructure assessment that covers projected growth over 12 to 36 months prevents this directly.
Why is Tier III+ important for colocation reliability?
Tier III+ facilities offer concurrent maintainability and high redundancy, supporting the 99.999% uptime benchmark that critical workloads require. Choosing a lower-tier facility to reduce cost often increases total risk exposure significantly.
How do you ensure DR and failover works in a colocation environment?
Schedule regular disaster recovery tests, document every failover procedure in a runbook, and use remote hands for failover operations when your team isn't on-site. Testing quarterly, not annually, is the standard that separates resilient operations from reactive ones.